User Guide
1. Streamline Client
2.Streamline Server
3. Starting Up
4. Connecting data
5. Demand and Sales Forecasting
6. Inventory Planning
7. Reference
1. Streamline Client
2.Streamline Server
3. Starting Up
4. Connecting data
5. Demand and Sales Forecasting
6. Inventory Planning
7. Reference
 Add this page to your book
  Remove this page from your book
 In this article we describe:
Replenishment parameters are the controls that affect a replenishment plan calculated by Streamline. In other words, they are the inputs of the replenishment plan calculation process. Streamline’s replenishment parameters can be divided into three categories:
A description, requirements, and default values for the replenishment parameters are given in the table below.
| Parameter | Description | Given in | Format | Default value |
|---|---|---|---|---|
| Basic parameters | ||||
| Horizon | The number of future periods for which you want to build an ordering plan. | Data aggregation periods | Integer | 12 |
| Replenishment strategy | The method that drives the replenishment process. There are two options, Min/max strategy and Periodic strategy. | Periodic strategy | ||
| Safety stock periods | The number of future periods which demand is used as the Safety stock. | Data aggregation periods | Integer or fractional number (example: 1.5) | 1.0 |
| Service level | The percentage of time (in the long run) that the item is in stock. | Percentage | Integer | 98% |
| Lead time | It refers to either the supplier lead time; or the lead time from the DC to the location, depending on the echelon the planning item resides at. | Days | 30 | |
| Order cycle | If the planning item is sourced from a supplier, this is the frequency your order from this supplier; if it is sourced from a DC, it is the frequency you replenish from the DC. | Data aggregation periods, days, or the Lead times. | 1 data aggregation period | |
| On hand | The quantity of an item that is currently in stock | 0 | ||
| Open orders information | ||||
| Qty to receive | The amount of the item to be received based on an open order line. That can be manufacturing, transfer, or purchase order. | Integer | 0 | |
| Delivery date | The expected delivery/build date of the item. It is attached to the corresponding open order line. | Date format | The beginning of the first forecasted period | |
| Qty to ship | The amount of the item to be shipped based on an open sales order line. | Integer | 0 | |
| Shipment date | The date, the corresponding sales order line should be shipped to the customer. | Date format | The beginning of the first forecasted period | |
| Constraints | ||||
| Min lot | The minimum quantity that you can order from the supplier or DC. The item source – supplier or DC – depends on the echelon the item resides at. | Integer | 0 | |
| Max lot | The maximum quantity that you can order from the supplier or DC. | 0 | ||
| Rounding | The rounding constraint on the ordered quantity. It allows Streamline to take into account how many items come packed in a carton. | 0 | ||
| Display qty | The minimum number of units a shelf to display. This parameter typically arises in the retail business. | 0 | ||
| Ordering availability | This parameter allows you to define the particular future periods in which Streamline can generate purchase orders. By default this option is disabled, meaning that all future periods are available for placing purchase orders. | Boolean | true | |
| Shelf life | The desired time the item can be in stock. | Data aggregation periods | Integer | ∞ |
| Shelf life exceeding | The average percentage of the item replenished quantity that may be discarded. | Percentage | 5% if the Shelf life is given. | |
Zero value for the Constraints means that there are no constraints.
If you import data from Excel files (XLS, XLSX), Streamline understands any date that is formatted by Excel standards. For text files like CSV, the date should be in one of the following formats:
dd.mm.yym/d/yymm/dd/yyyyyyyy/mm/ddyyyy-mm-ddyyyy_mm_ddyyyymmdd Streamline also recognizes these formats in Excel files.
There are several ways to set up replenishment parameters in Streamline. Each of them differs in the spectrum of parameters it is able to set up, and the level of details these parameters are set at.
The table below shows the available methods and the level of detail the modification happens.
| Method | Level of detail |
|---|---|
| Modifying defaults using the Settings | Changes are applied to all of your planning items at once. It means that you can't set up different values for two planning items. |
| Importing from the data source | You can set each parameter on an item basis. Bulk changes are supported. |
| Editing in the inventory reports | |
| Importing from Excel |
The table below shows the replenishment parameters each method can modify.
| Modifying defaults | Importing from data source | Editing in report | Importing from Excel | |
|---|---|---|---|---|
| Basic parameters | ||||
| Replenishment strategy |  | |||
| Safety stock periods | | | | |
| Service level | | | | |
| Lead time Order cycle | | | | |
| On hand | | |
||
| Open orders information | ||||
| Qty to receive | | 1 | 1 |
|
| Delivery date | | 1 |
||
| Qty to ship | | 1 |
||
| Shipment date | | |||
| Constraints | ||||
| Min lot Max lot Rounding Display qty | | | |
|
| Shelf life | | | |
|
| Shelf life exceeding | | | |
|
1Unlike Importing from the data source, Editing in the inventory report and Importing from Excel do not allow you to set Qty to receive and Qty to ship for each order individually. They set these parameters as total quantities on all of the corresponding open orders. For example, you have two open purchase orders with quantities to receive of 10 and 20 units correspondingly. Then, you should set the Qty to receive as 30 units.
However, if the Delivery date is given in the Importing from Excel method, Streamline treats that as if the given Qty to receive will be delivered on that date. In other words, Qty to receive now refers to one order only, not to a total quantity on a set of orders.
Planning horizon is set up using the Horizon control that resides in the Toolbar of the Demand forecasting tab.
The Ordering availability constraint is configured using the program Setting and options on the Demand forecasting tab.
As an option, you can override the calculated Safety stock by Editing it in the inventory report or Importing from Excel. In these cases, the updated parameters are used as inputs to compute Streamline’s ordering plan.
However, not all of the parameters shown in the second column of the table can be modified by Importing from the data source. The parameters set depends on the data connection that was used to create the project. The table above shows the capabilities for the Database connection and Transactional spreadsheet connection. To find out the capabilities for:
The first three methods are designed for standard situations:
The last one – Importing from Excel – is an additional way for configuring replenishment parameters. This method can be considered as an alternative to Editing in the inventory report. It is handy in the following situations:
There is a priority sequence of how Streamline applies given parameter values across the four methods mentioned above. The priority sequence (beginning from the least priority) is the following:
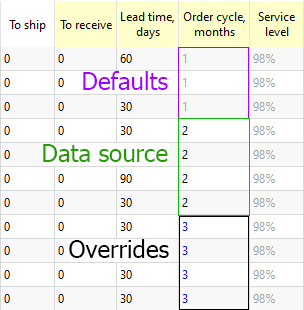
1. Streamline defaults have the lowest priority. The first method sets these. Defaults are shown in gray in the inventory report (see figure below).
2. Parameters imported or reimported (when you update the project) from your data source replace defaults. That happens when you use the Importing from the data source method. These replacements are displayed in black in the inventory report (see figure below).
3. Changes made in the inventory report or imported from an Excel file are overrides that have the highest priority. They are depicted in blue in Streamline (see figure below).
This method resets the defaults for all your planning items at once.
Let's go to the menu File > Settings > Inventory tab (see figure below).
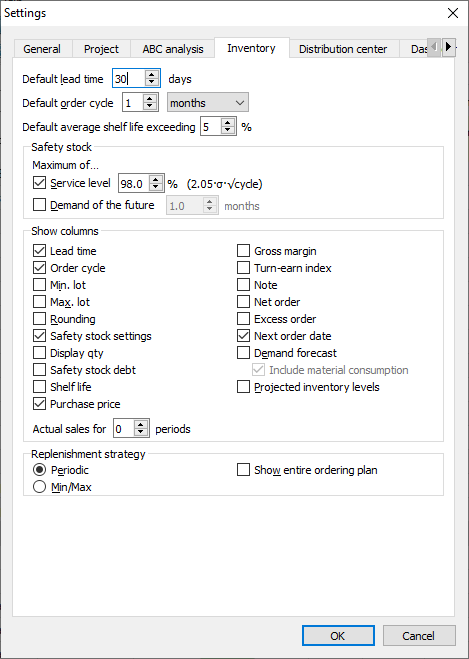
This tab contains replenishment defaults for all your locations, except for the distribution centers (DCs).
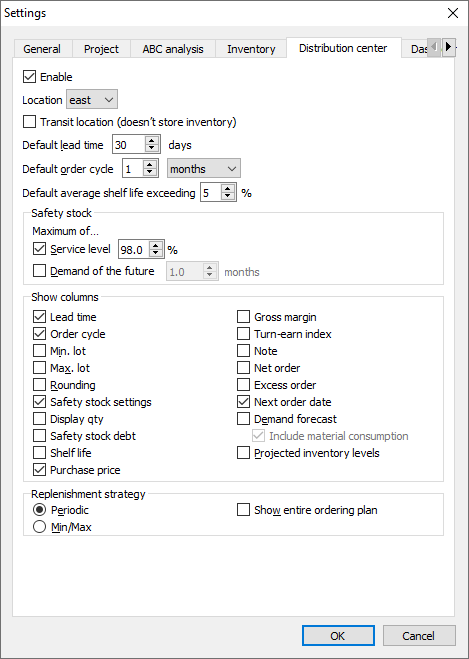
In case, your supply chain includes DCs, the Distribution center tab is used to set up the defaults for them (see figure below).
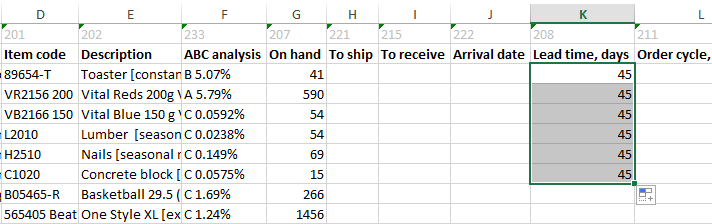
Consider an example. Our data source in the example is an Excel file having aggregated sales history (see figure below).
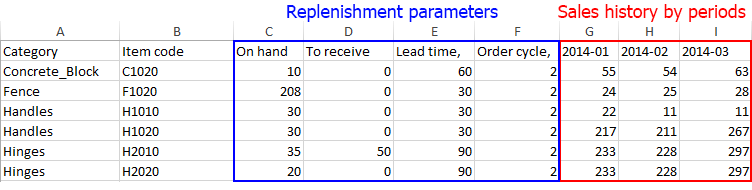
As you see here, the file contains the following replenishment parameters as On hand, Qty to receive, Lead time, Order cycle.
Now, we will use the Aggregated spreadsheet connection to create a new project based on this data source. To do this, we go to the menu File > New > Spreadsheet connection > Aggregated data and set the proper meaning for our spreadsheet columns (see figure below).
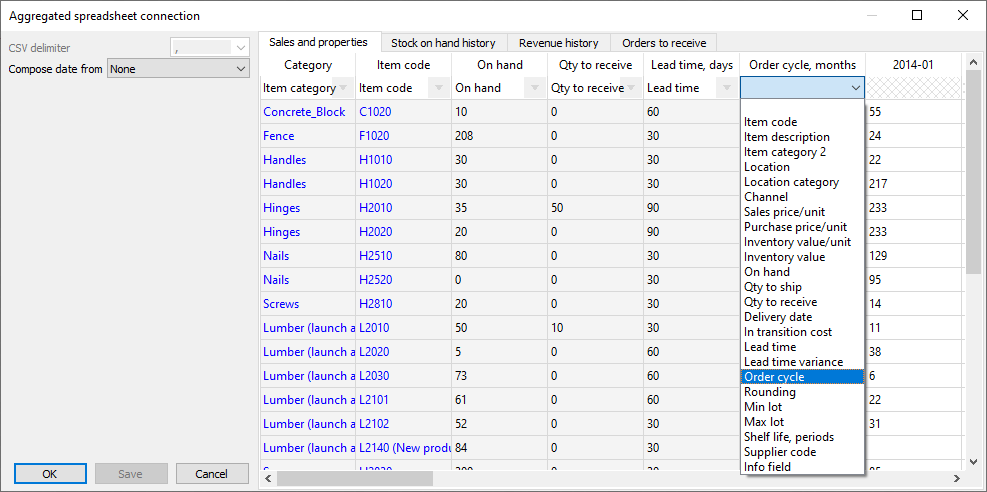
Finally, we click OK to start the import process and create the project.
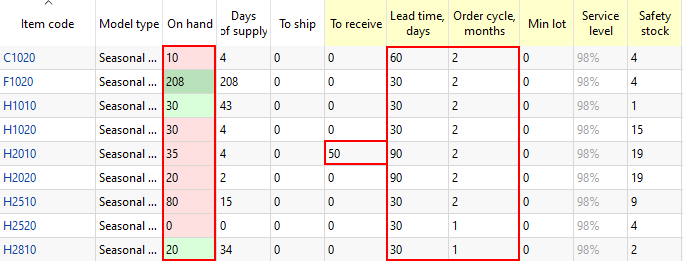
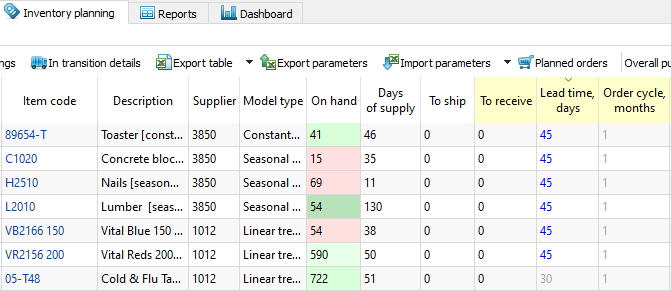
Now, let's go to the Inventory planning tab to see the imported replenishment parameters (see figure below).
Now, let's demonstrate how Streamline automatically synchronizes replenishment parameters that were changed in the data source.
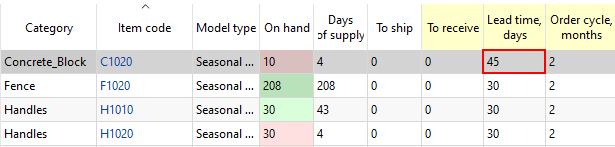
To illustrate this, we open our Excel file and change, for instance, Lead time for item C1020 (see figure below).

Then, we saved the Excel file and clicked the Update data button in Streamline. As you see from the figure below, the lead time has been updated.
Streamline has three main tabs which are designed to plan your inventory. These are Inventory planning, Intersite optimization, and Distribution center. Each of these tabs may contain a set of custom reports displaying a slice of your inventory. We use term inventory report to refer to any of these reports.
Modifying replenishment parameters using inventory reports is the easiest and the most commonly used way to adjust and fine-tune the replenishment process before getting the ordering plans.
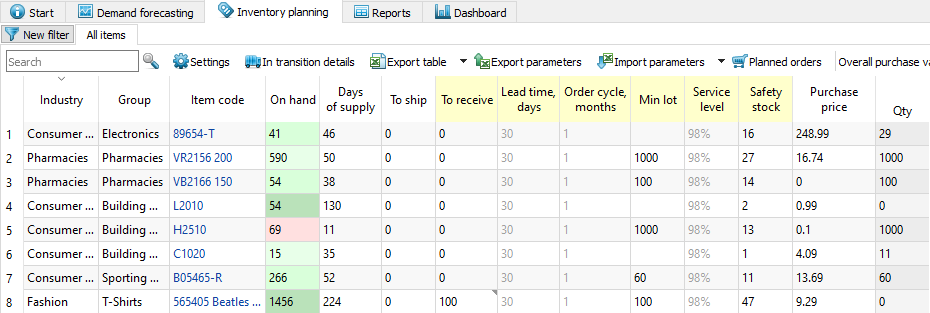
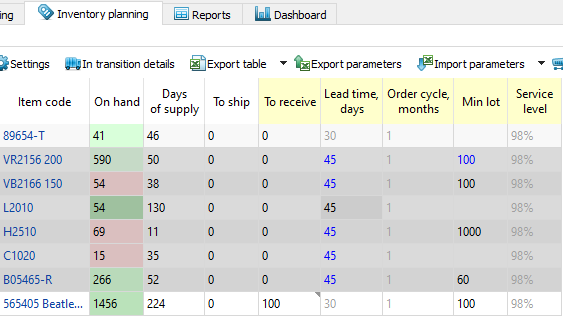
There is a default report called All items located under each of the mentioned tabs. It displays all the available inventory. Let's open the Inventory Planning by Month built-in example and proceed to the Inventory planning tab (see figure below).
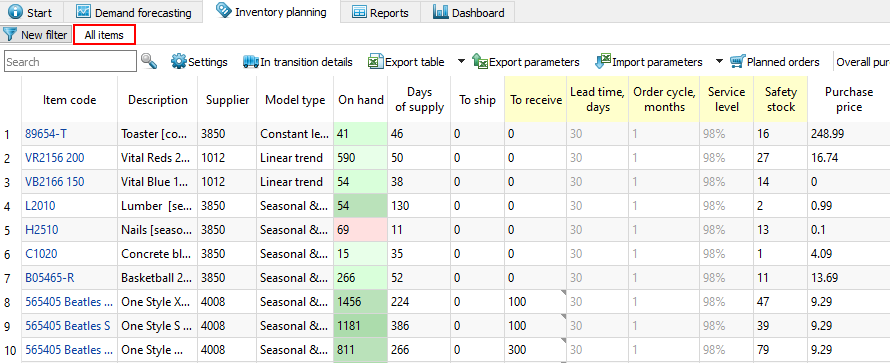
As you see, the report contains columns such as On hand, To ship, To receive, Lead time, and others. These replenishment parameters refer to your locations that are not distribution centers (DCs). Replenishment parameters for DCs are on the Distribution center tab. This example doesn't contain DCs, thus, Distribution center tab is hidden.
By default, inventory reports show columns for only those replenishment parameters that were imported from your data source. However, you can include all the available parameter by changing the display settings of the report. To do this:

This example has the Min lot parameter given. Let's show it by checking the Min. lot option. The result is shown in the figure below.
To edit a replenishment parameter in any inventory report:
In our example, we have changed the Min lot from 1000 to 100 for item VR2156 200 (see figure below).

As you see, quantity to order, recommended by Streamline, has also changed.
Direct changes in inventory reports are overrides. They are depicted in blue (see figure above).
To revert to the original parameter value:
Streamline allows you to create custom reports based on filters. Those reports display the same columns as the All items report does. A custom inventory report is a filtered view of the All items report. It also allows you to make changes to the replenishment parameters just in the same way as we describe above.
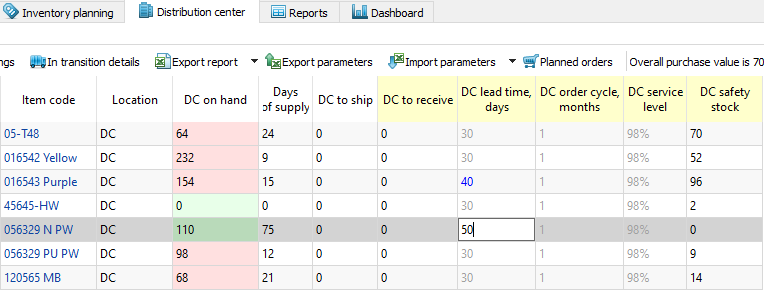
Distribution center tab provides the same possibilities to modify replenishment parameters as Inventory planning tab does (see figure below).
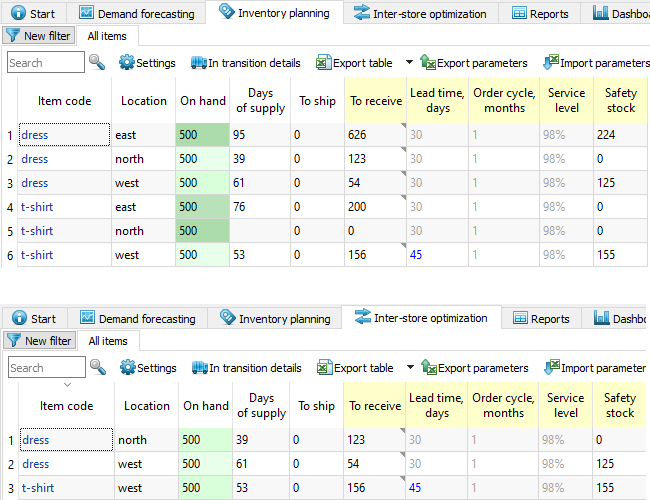
Intersite optimization tab duplicates (see figure below) the replenishment parameters shown in the Inventory planning tab. Normally, this tab is used to create and export transfer orders between location, not to specify replenishment parameters. However, you can also set them there.
Streamline allows you to make mass editing of a replenishment parameter in inventory reports. To do this:
1. Select the range of items which you want to modify. Hold Ctrl or Shift to select a set of successive items. Last mouse click should be within the parameter column that you intend to modify.
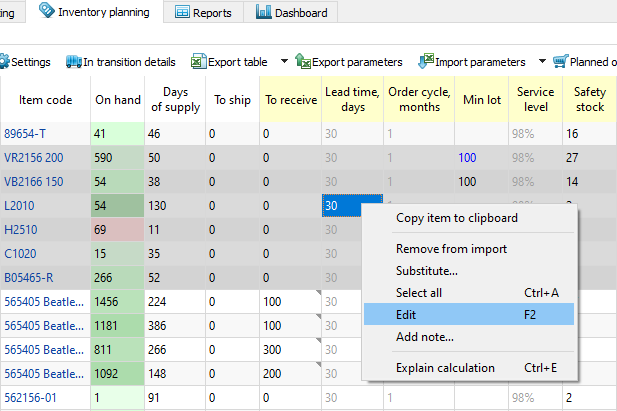
2. Press F2; or right-click on a cell in the parameter column within the selected area and choose the Edit command from the context menu (see figure below).
3. Enter a new value and press Enter to confirm the changes.
In our example, we have changed the Lead time from 30 to 45 for a set of planning items (see figure below).
To perform a mass revert to the original values:
1. Select the range of items for which you want to clear overrides. Hold Ctrl or Shift to select a set of successive items. Last mouse click should be within the parameter column that you intend to modify.
2. Press F2; or right-click on a cell in the parameter column within the selected area and choose the Edit command from the context menu.
3. Delete the value and press Enter to confirm the changes.
This method is an alternative to the Editing in the inventory report and can be also used to set up replenishment parameters in Streamline.
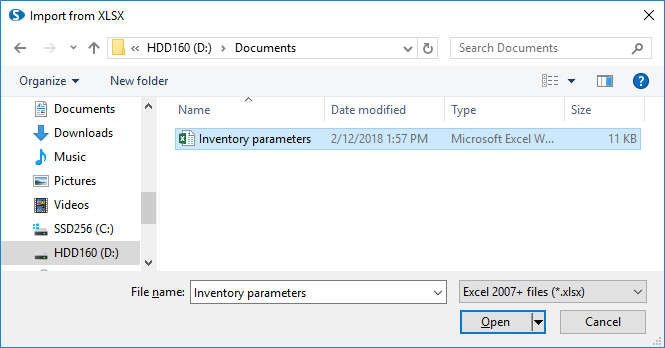
To get replenishment parameters imported correctly from an Excel file, we should know the format of the file that Streamline understands. To find out the file format, click the Export parameters button on the toolbar (see figure below).

Now, you can use the newly created file as a template to fill your parameters in there. As an example, we set up the Lead time to 45 days for the first six items (see figure below).
Then, save the file and click the Import parameters button in Streamline to import your overrides (see figure below).

All the changes are now imported into Streamline and shown in blue (see figure below).
To import parameters from another file:
1. Click on the little arrow near the Import parameters button (see figure below).
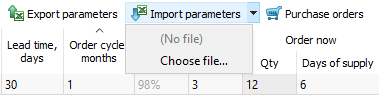
2. Select the Choose file… option (see figure below).
3. Navigate to your file and click the Open button.
You can forbid Streamline to generate purchase orders in given periods in the future. This is useful when your supplier can't take orders during some time in the future for some reasons.
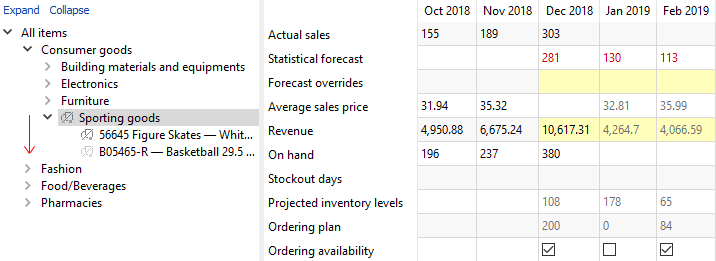
Let's illustrate this using an example. We open the built-in example Inventory planning by month, go to the Demand forecasting tab, and select the Figure skates product under the Sporting goods category in the tree (see figure below).
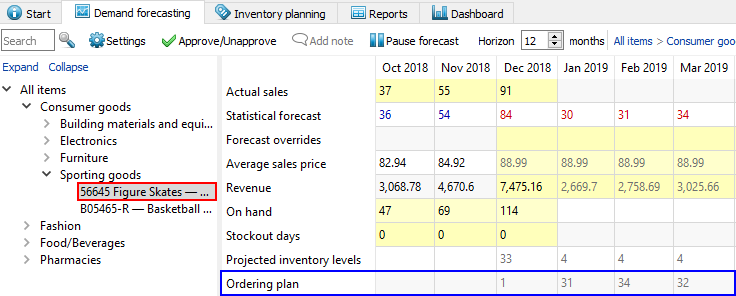
As you see, Streamline recommends placing a purchase order in each of the future periods.
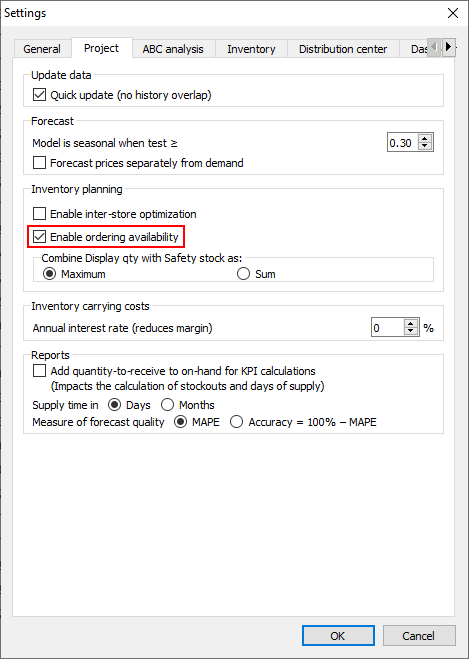
Assume, our supplier can't take orders in January and February of 2019 for this product. To set these constraints, we go to the menu File > Settings > Project tab and check the Enable ordering availability option (see figure below).
Now, a new row called Ordering availability has been added into the Table (see figure below).
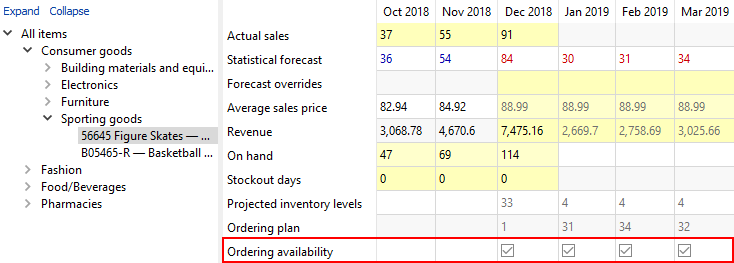
This row has a set of checkboxes allowing you to specify the periods where Streamline is permitted to generate purchase orders. By default, there are no restrictions on that; Streamline is allowed suggesting orders in any of the future periods. The default color for the Ordering availability checkboxes is gray, meaning that this parameter has not been changed yet.
Now, let's set our constraints (see figure below).
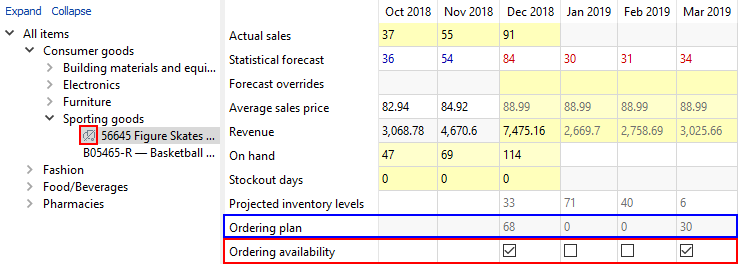
As you see from the figure, as soon as we set the constraints:
 has been added to the currently selected tree node indicating changed ordering availability options.
Now, we don't have orders in January and February – the order quantity is zero (see figure above). However, the current order has been increased from 1 unit to 68 units, in order to cover the demand for January and February.
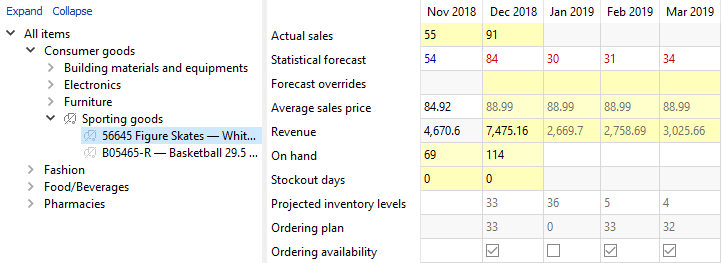
Assume, we need to set up ordering availability constraint at a category level, for example, for all sporting goods. To do this, we click at this node in the tree and disallow ordering, for instance, for January 2019 (see figure below).
As you see, the ordering availability constraint was propagated down the tree to the lowest level. Now item B05465-R has a gray icon  .
.
.
As an example, let's remove ordering availability for the product Figure skates. To do this, right-click at the node in the tree and select the Mass clear > Ordering availability command from the context menu.
In our example, Figure skates product is under the Storting goods category which has its own ordering availability constraint. As you see, the icon for our product has changed to its gray version in the tree, meaning that the node now inherits the options from the parent node.
You can apply Mass clear commands at any level of the tree.
 Manage book (
 Help
Help