User Guide
1. Streamline Client
2.Streamline Server
3. Starting Up
4. Connecting data
5. Demand and Sales Forecasting
6. Inventory Planning
7. Reference
1. Streamline Client
2.Streamline Server
3. Starting Up
4. Connecting data
5. Demand and Sales Forecasting
6. Inventory Planning
7. Reference
 Add this page to your book
  Remove this page from your book
 Streamline has a translation tool called Translator. It is specially designed for adding new languages and creating translations for Streamline's user interface (UI). Translator allows you to:
To add a new translation in Streamline:
1. Run Translator. To do this, go to the menu Help > Language > Translation tool (see figure below).
![]()
2. Enter a name for the new language into the Language name field.
3. Choose the language you want to translate from in the Based on drop-down list.
4. Select the Complete translation option (see figure below).
![]()
5. Click OK.
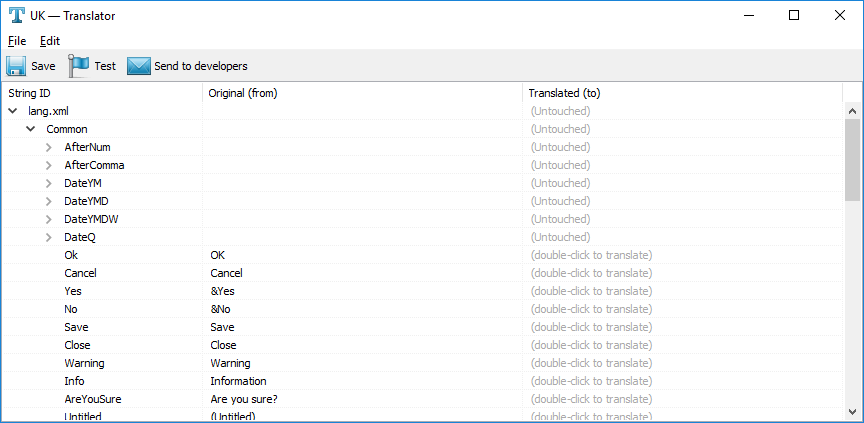
As you click OK, Translator shows its main window (see figure below).
![]()
This window contains a table having three columns. Description of the columns is the following.
To translate a string:
1. Dig the tree down to the string (or find the string) you want to translate.
2. Double click on the line containing the string. Translator opens the Edit string dialog.
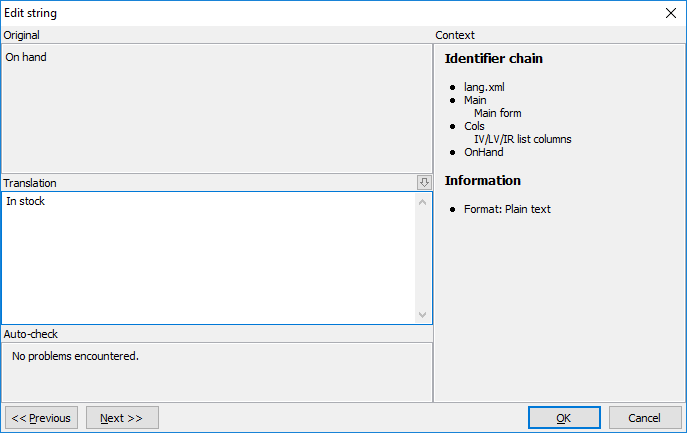
3. Enter your translation into the Translation field (see figure below).
![]()
The Previous and Next buttons of the dialog allows moving to the previous and next string in the tree.
Identifier chain section on the left of the dialog allows you to find out what the current string is intended for. For example, identifiers Main and Ui mean that the string is somewhere in the user interface of the main form. Both developers and automatic tools leave some comments. They are displayed in the Identifier chain (see figure above).
Auto-check section displays discrepancies between the original and the translation.
4. Click OK.
After you click OK, the result will appear in the main window (see figure below).
![]()
There are several special symbols in the original language that should be kept in your translation.
| Symbols | Description |
|---|---|
 | Line break is required. |
 | Space symbol is required at the end of the line. |
| {1}, {2}… | Substitution marks. The number in braces indicates the serial number of the substitution. Substation mark is a sub-string in the original sentence. For example, in “Save {1}?”, {1} is substituted by a project file name. All substitution marks work regardless of order and quantity. For example, “The capital of {2} is {1}, {1}.”. If {1} = “London” and {2} = “the UK”, then the result will be “The capital of the UK is London, London.”. |
| {1|0=Monday|1=Tuesday} | Some enumeration. |
| {1|q=file:s} {1|q=wom:an,en} {1|q=woman, women} | Plural form, short version. In the short version, Translator automatically inserts the number and space before the translation. For example, “1 woman”, “2 women”. |
| {1|Q=? file,? files} | Plural form, long version. In this case, you can set the format of the string. Question mark “?” will be substituted by the number. For example, {1|Q=? file,? files} results in “1 file” and “2 files”. |
After you finish your translation, click the Save button in the Translator toolbar.
Translator allows you to create a variation of an existing translation. This comes in handy when you need to dispute spelling, change the terminology according to your field of work, etc..
To create a variation of an existing translation:
1. Run Translator. To do this, go to the menu Help > Language > Translation tool. After that, the New translation window shows up (see figure below).
![]()
2. Enter a name for your variation into the Language name field.
3. Choose the source translation in the Based on drop-down list.
4. Select the Localization patch option.
5. Click OK.
After that, Translator shows its window (see figure below).
To find a specific term or a phrase in the language source, use Translator search. To do this, go to the menu Edit > Find…. The Find dialog shows up then (see figure below).
![]()
In the dialog:
To find the next occurrence, press F3 button or use the menu command Edit > Find next.
To edit a string:
1. Double click on the line containing the string. The Edit string dialog appears.
2. Enter you variant into the Translation field (see figure below).
3. Click OK.
The result of the edit will appear in the main window (see figure below).
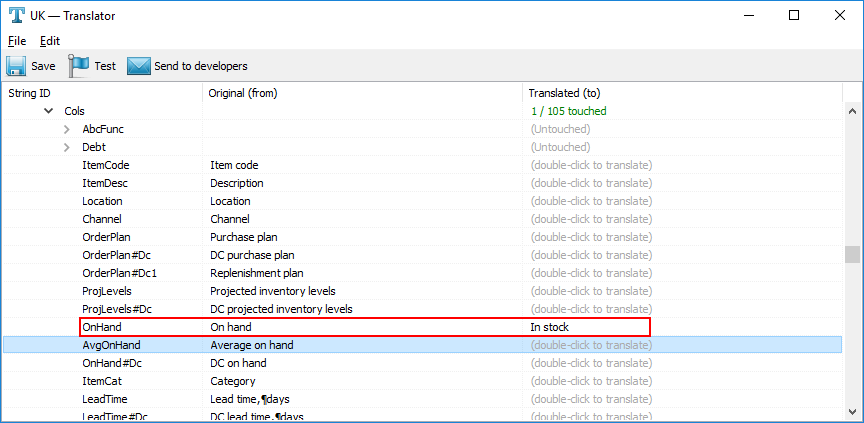
Translator counts the number of overrides you have made and shows it in the Translated (to) column at a category level in green (see figure above).
To test a translation, click the Test button in the Translator toolbar (see figure below).
![]()
As you click the button, Translator runs Streamline with your language active (see figure below).
![]()
All the strings that haven’t been yet translated are enclosed in special symbols (triangles) (see figure above).
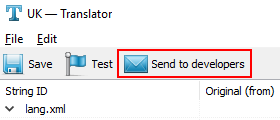
If you want your translation to be included in the distributed installation package of Streamline, you can send us your translation. To do this:
1. Click the Send to developers button in the Translator toolbar (see figure below).
2. Enter your name into the Your name field.
3. Enter your email into the Your email field.
4. Type you message in the Comments field (see figure below).
![]()
5. Click OK.
If everything is okay, Translator will notify you about that (see figure below).
![]()
The differences between the Complete translation and Localization patch options are shown in the table below.
| Complete translation | Localization patch |
|---|---|
| Translation into another language. | A variation of existing translation: disputing spelling, changing terminology according to your field of work, etc. |
| Translator tracks the progress of your work. Initially, all the translation project is colored red. Categories turn green as you finish them. | Translator only marks the categories you have touched. The rest are grey. |
| All the strings that haven’t been yet translated are marked with special symbols in Streamline. | No marks in Streamline. |
| If a new version of program arrives, Translator highlights everything that was changed or added. | If a new version of the program arrives, Translator only highlights the strings that were changed both by you and by developers. |
| Translator creates a default locale.xml. You need to edit it according to language specifics. | Translator takes locale.xml from the source language (version 4.7.10+). |
 Manage book (
 Help
Help