User Guide
1. Streamline Client
2.Streamline Server
3. Starting Up
4. Connecting data
5. Demand and Sales Forecasting
6. Inventory Planning
7. Reference
1. Streamline Client
2.Streamline Server
3. Starting Up
4. Connecting data
5. Demand and Sales Forecasting
6. Inventory Planning
7. Reference
 Add this page to your book
  Remove this page from your book
 Database connection allows you to export Streamline's outcomes back to your database. In this article, we describe how you can:
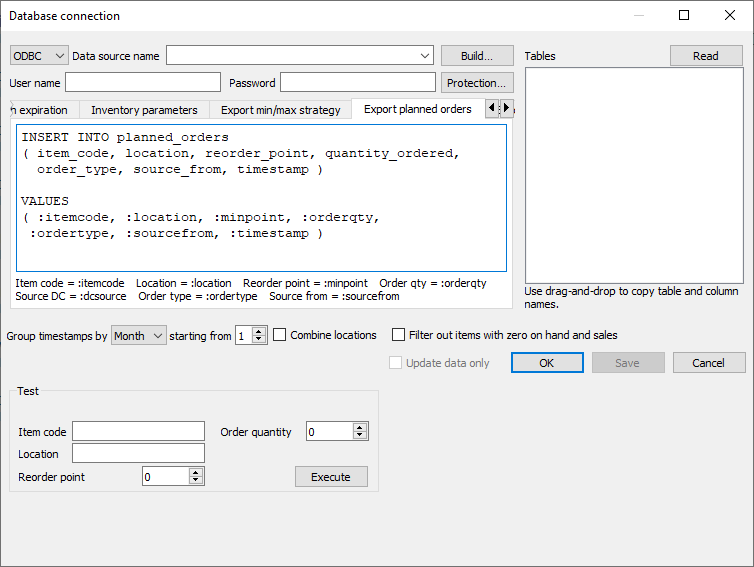
Database connection allows you to export current replenishment orders into the database of your ERP system or an intermediate database by executing an SQL-query. This query should be given in the Export planned orders tab of the Database connection dialog (see figure below).
If you are going to use an intermediate database, here is a query to create the planned_orders table:
CREATE TABLE [dbo].[planned_orders](
        id [int] IDENTITY(1,1) PRIMARY KEY,
	item_code [nvarchar](250) NOT NULL,
	location [nvarchar](250) NULL,
	reorder_point [INT] NULL,
	quantity_ordered [INT] NOT NULL,
	order_type [nvarchar](250) NULL,
	source_from [nvarchar](250) NULL,
	timestamp [datetime] NULL,
)
You can download this query as an SQL-file.
There are several marks that you can use in this query. They are substituted by the corresponding data when the query is executed. The marks, their description, and the substitution source are given in the table below.
| Mark | Column of the Planned_orders_preview_dialog | Description |
|---|---|---|
| :itemcode | Item code or Supplier's item code | The item code. |
| :orderqty | Qty | The quantity to order. |
| :location | Location | The location where the Item code will be delivered to. |
| :sourcefrom | Source from |
The source, from where the Item code will be delivered. Source from depends on the exported order type:
|
| :minpoint | Reorder point | The reorder point calulcated by Streamline. It is determined if the Min/Max replenishment strategy is used. |
| :ordertype | Order type | The type of the planned order. There are three types of orders that Streamline exports: purchase, transfer, and manufacturing. |
| :timestamp | The identifier of the export session, which is the date and time when the export was started. Streamline assigns the same timestamp to each of the exported line in the current export session. | |
| :dcsource | This mark is now deprecated. |
Streamline makes the substitutions and executes this query when you click the Create button in the Planned orders preview dialog. This query is executed for every order line that is checked in the mentioned dialog.
Below, is an example of an SQL-query that exports all possible data accompanying an exported order line.
INSERT INTO planned_orders
( item_code, location, reorder_point, quantity_ordered,
  order_type, source_from, timestamp )

VALUES
( :itemcode, :location, :minpoint, :orderqty,
 :ordertype, :sourcefrom, :timestamp )
You can download this query as an SQL-file.
The Test section of the tab allows you to test your query using the data entered into the fields of this section. These values will substitute the marks in your query. To run the test, click the Execute button.
Streamline allows you to export:
All of these reports can be exported with a single SQL-query. You can also choose which one (or a set) of the reports you need to export.
Streamline allows you to export data rows with the following columns:
This data should go into a table of your database. If you don't have it, create it. Below, we show an example of SQL-query that creates such a table.
CREATE TABLE [dbo].[export_forecast_report](
	item_code [nvarchar](250) NOT NULL,
	location [nvarchar](250) NULL,
	forecast_date [smalldatetime] NULL,
	period_start_date [DATE] NULL,
	period_end_date [DATE] NULL,
	demand_forecast [INT] NULL,
	purchase_plan [INT] NULL,
	inventory_projection [INT] NULL,
        projected_revenue [DECIMAL](18, 3) NULL,
)
You can download this query as an SQL-file. In our example, the table has columns for all the data you can export.
After the table has been created, the next step is writing an SQL-query that will export the data into the table. There are a set of marks that you can use in this query to export a particular piece of data. Those marks are substituted by the corresponding data when the query is executed. The marks, corresponding substitution, and the substitution source are given in the table below.
| Mark | Substitution | Substitution source |
|---|---|---|
| :itemcode | Item code | Inventory planning tab |
| :location | Location | |
| :forecastdate | Current date | Operating system |
| :startdate | Period start date | Event model |
| :enddate | Period end date | |
| :forecast | The value of the corresponding cell of the report | Final forecast report |
| :purchaseplan | Ordering plan | |
| :invprojection | Projected inventory report | |
| :projrevenue | Projected revenue report |
Below, we give an SQL-query example that exports data of all the reports.
INSERT INTO export_forecast_report (
[item_code],
[location],
[forecast_date],
[period_start_date],
[period_end_date],
[demand_forecast],
[purchase_plan],
[inventory_projection],
[projected_revenue])
VALUES (
:itemcode,
:location,
:forecastdate,
:startdate,
:enddate,
:forecast,
:purchaseplan,
:invprojection,
:projrevenue
);
You can download this query as an SQL-file. This query is designed to insert data into the table we have created before.
Then, insert your query into the Export inventory forecast tab (see figure below).
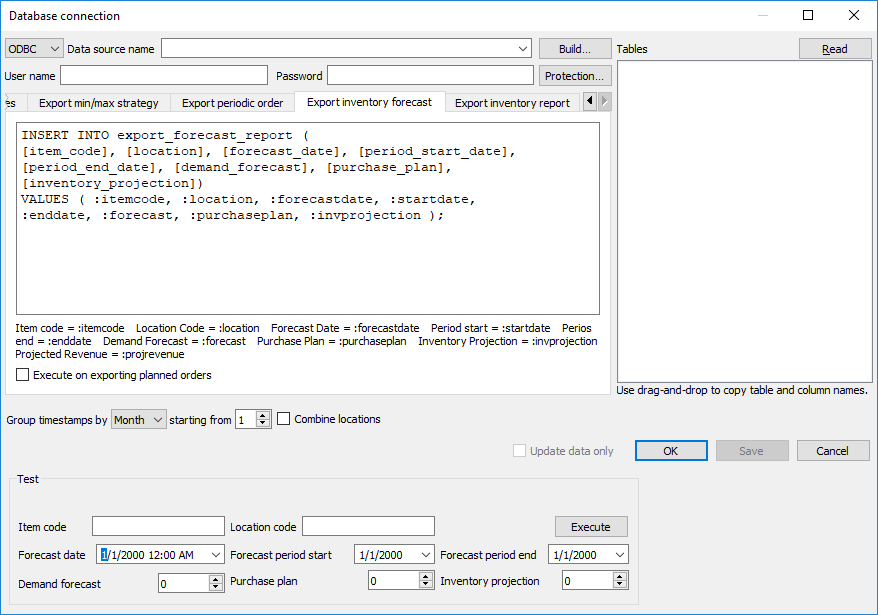
The Execute on exporting planned orders option sets up Streamline to trigger the execution of your query as you click the Create button of the Planned orders preview dialog.
The Test section of the tab allows you to test your query using the data entered into the fields of this section. These values will substitute the marks in your query. To run the test, click the Execute button.
After all, click the Save button.
Now, to export your reports:

Streamline allows you to export almost the entire report of the All items filter of the Inventory planning tab into a database. These capabilities don't include exporting the following parts of the report as:
However, all of these you can export using the Export inventory forecast tab. In this section, we show how all the other columns of the report can be exported.
The exported data should get into a table of your database. Thus, it should be created beforehand. Below, we give an example query that creates such a table.
CREATE TABLE [dbo].[export_inventory_report](
	[item_code] [nvarchar](250) NOT NULL,
	[item_description] [nvarchar](250) NULL,
	[location] [nvarchar](250) NOT NULL,
	[distribution_center] [nvarchar](250) NULL,
	[bom_type] [nvarchar](250) NOT NULL,
	[supplier] [nvarchar](250) NOT NULL,
	[model_type] [nvarchar](250) NULL,
	[inventory_on_hand] [DECIMAL](18, 3) NULL,
	[on_hand_supply_days] [INT] NULL,
	[on_hand_supply_month] [INT] NULL,
	[backorder] [INT] NULL,
	[in_transition] [DECIMAL](18, 3) NULL,
	[leadtime] [INT] NULL,
	[order_cycle] [INT] NULL,
	[min_lot] [INT] NULL,
	[max_lot] [INT] NULL,
	[rounding] [INT] NULL,
	[service_level] [DECIMAL](18, 3) NULL,
	[minimum_display_quantity] [INT] NULL,
	[safety_stock] [nvarchar](250) NULL,
	[debt_received] [DECIMAL](18, 3) NULL,
	[debt_accumulated] [DECIMAL](18, 3) NULL,
	[debt_passed] [INT] NULL,
	[shelf_life] [INT] NULL,
	[shelf_discard] [INT] NULL,
	[purchase_price] [DECIMAL](18, 3) NULL,
	[gross_margin] [DECIMAL](18, 3) NULL,
	[turn_earn_index] [DECIMAL](18, 3) NULL,
	[note] [nvarchar](250) NOT NULL,
	[order_now_quantity] [DECIMAL](18, 3) NULL,
	[order_now_net_order_quantity] [DECIMAL](18, 3) NULL,
	[order_now_excess_order] [DECIMAL](18, 3) NULL,
	[order_now_purchase_value] [DECIMAL](18, 3) NULL,
	[order_now_days_of_supply] [INT] NULL,
	[order_now_margin] [DECIMAL](18, 3) NULL,
	[next_order_by] [DATE] NULL,
	[dc_fill_rate] [DECIMAL](18, 3) NULL,
	[reorder_point] [INT] NULL,
	[reorder_amount] [INT] NULL,
	[stockout] [INT] NULL,
	[overstock] [INT] NULL,
	[write_offs] [INT] NULL,
)
GO
You can also download this query as an SQL-file.
After the table has been created, the next step is writing an SQL-query that will export the data into the table. There are a set of marks that you can use in this query to export a particular piece of data. Those marks are substituted by the corresponding data when the query is executed. The marks, corresponding substitution, and the substitution source are given in the table below.
| Mark | Substitution (column) | Substitution source |
|---|---|---|
| :itemcode | Item code | Table of the Inventory planning tab |
| :itemdescr | Description | |
| :bomtype | Manufacturing status | |
| :distcenter | DC | |
| :supplier | Supplier | |
| :modeltype | Model type | |
| :onhand | On hand | |
| :dcfillrate | DC fill rate | |
| :ohsupplydays | Days of supply | |
| :ohsupplymonth | Months of supply | |
| :backorder | To ship | |
| :intransition | To receive | |
| :leadtime | Lead time, days | |
| :ordercycle | Order cycle, periods | |
| :minlot | Min lot | |
| :maxlot | Max lot | |
| :rounding | Rounding | |
| :servicelevel | Service level | |
| :minshelf | Display qty | |
| :shelflife | Shelf life, periods | |
| :shelfdiscard | Shelf life exceeding, % | |
| :safestock | Safety stock | |
| :purchaseprice | Purchase price | |
| :margin | Gross margin | |
| :debtreceived | Safety stock debt Received | |
| :debtaccumulated | Safety stock debt Accumulated | |
| :debtpassed | Safety stock debt Passed | |
| :turnearn | Turn-earn index | |
| :qty | Current order Qty | |
| :posupplydays | Current order Days of supply | |
| :pomargin | Current order Margin | |
| :netorder | Current order Net order | |
| :excessorder | Current order Excess order | |
| :purchasevalue | Current order Order value | |
| :nextorderby | Next order date | |
| :reorderpoint | Reorder point | |
| :maxinventory | Max inventory | |
| :stockout | Stockout | |
| :overstock | Overstock | |
| :writeoff | Write-offs |
Below, we give an example query that exports all the columns of the Inventory planning tab table.
INSERT INTO [dbo].[export_inventory_report](
	[item_code] ,
	[item_description],
	[location],
	[distribution_center],
	[bom_type],
	[supplier],
	[model_type],
	[inventory_on_hand],
	[on_hand_supply_days],
	[on_hand_supply_month],
	[backorder],
	[in_transition],
	[leadtime],
	[order_cycle],
	[min_lot],
	[max_lot],
	[rounding],
	[service_level],
	[minimum_display_quantity],
	[safety_stock],
	[debt_received],
	[debt_accumulated],
	[debt_passed],
	[shelf_life],
	[shelf_discard],
	[purchase_price],
	[gross_margin],
	[turn_earn_index],
	[note],
	[order_now_quantity],
	[order_now_net_order_quantity],
	[order_now_excess_order],
	[order_now_purchase_value],
	[order_now_days_of_supply],
	[order_now_margin],
	[next_order_by],
	[dc_fill_rate],
	[reorder_point],
	[reorder_amount],
	[stockout],
	[overstock],
	[write_offs])
VALUES (
:itemcode,
:itemdescr,
:location,
:distcenter,
:bomtype,
:supplier,
:modeltype,
:onhand,
:ohsupplydays ,
:ohsupplymonth,
:backorder,
:intransition,
:leadtime,
:ordercycle,
:minlot,
:maxlot,
:rounding,
:servicelevel,
:minshelf,
:safestock,
:debtreceived,
:debtaccumulated,
:debtpassed,
:shelflife,
:shelfdiscard,
:purchaseprice,
:margin,
:turnearn,
:note,
:qty,
:netorder,
:excessorder,
:purchasevalue,
:posupplydays,
:pomargin,
:nextorderby,
:dcfillrate,
:reorderpoint,
:maxinventory,
:stockout,
:overstock,
:writeoff
);
You can also download it as an SQL-file.
Then, insert your query into the Export inventory report tab (see figure below).
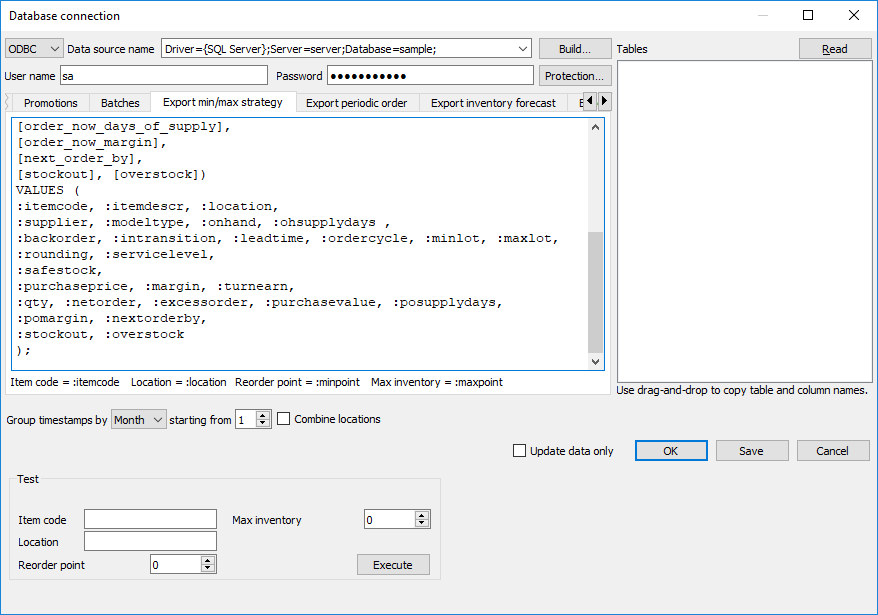
The Insert stub button allows you to insert a mark that corresponds to a particular column of the table. To see a list of the columns, click a little black triangle next to this button. To insert a mark, choose the column in the list.
The Execute on exporting planned orders option sets up Streamline to trigger the execution of your query as you click the Create button of the Planned orders preview dialog.
The Test section of the tab allows you to test your query using the data entered into the fields of this section. These values will substitute the marks in your query. To run the test, click the Execute button.
After all, click the Save button.
Now, to export the inventory report:
 Manage book (
 Help
Help