User Tools

Site Tools


Sidebar

Go to GMDH home page

Video Tutorials

User Guide

1. Streamline Client

2.Streamline Server

3. Starting Up

4. Connecting data

5. Demand and Sales Forecasting

6. Inventory Planning

7. Reference

spire-connection-guide

4.5.15. How to Import Data from Spire

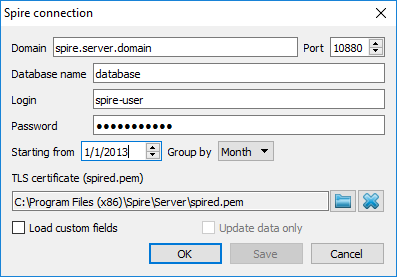
To import data from Spire, open Spire connection dialog by clicking menu File > New > Spire connection.

  • Domain. Enter the name of the domain name or the IP address of the machine running the Spire server. If the Spire server has been installed on the local machine, leave the field with the default value 'localhost'.
  • Port. Specify the Spire server port. By default, Streamline uses the Spire server default port offered in the Spire installation process. If you have set a custom port, enter it here.
  • Database name. Enter the name of the Spire database you are connecting to. Database names can be easily obtained from:
  • Spire Server Company List (Spire 2.10 or earlier).
  • Spire Server Monitor (Spire 3.0).

To do this, click on the Spire tray icon. For Spire 3.0 you will be prompted to enter the Administrator's credentials.

  • Login. The username of the Spire account for the database.
  • Password. The password of the Spire account for the database.
  • Starting from control allows you to import a slice of the data.
  • Group by control allows you to automatically aggregate the data in periods (days, weeks, months). For example, if you want to see the forecasts, procurement plan, and other reports in months, group the data by month.
  • TLS certificate option requires setting up the spired.pem file that is shipped along with Spire.
  • Spire 2.10 and earlier versions have it here: C:\Program Files (x86)\Spire\Server\spired.pem
  • Spire 3.0 has it here: C:\ProgramData\Spire\Server\spired.pem

Click the Browse button and set the file. If you are sure that the server you are connecting to is trusted (for example, it is located in an intranet or local network) the certificate can be omitted. In this case, click the “X” button to clear it.

  • Load custom fields option allows you to import additional information about your items such as Lead time and Order cycle. The lead time is read from the User Type field and the order cycle – from the Misc. field. Lead time must be given in days and order cycle in months. The fields' values can be set on the Details tab of the Inventory dialog in Spire.

  • Update data only option synchronizes the project with the Spire database.

After all, click OK.


Next: Unleashed

Download PDF

spire-connection-guide.txt · Last modified: 2023/03/13 12:32 by admin