User Guide
1. Streamline Client
2.Streamline Server
3. Starting Up
4. Connecting data
5. Demand and Sales Forecasting
6. Inventory Planning
7. Reference
1. Streamline Client
2.Streamline Server
3. Starting Up
4. Connecting data
5. Demand and Sales Forecasting
6. Inventory Planning
7. Reference
 Add this page to your book
  Remove this page from your book
 Unlike the Aggregated spreadsheet connection, Transaction spreadsheet connection is designed to import sales and other data in a form of a set of transactions. Aggregation of the transactions is performed automatically while the data is being imported. There are several data aggregation periods which you can select from before the import has been started. These are:
Thus, if you keep sales history and inventory information in a database, ERP, accounting or inventory management system, and have an ability to make an extract of sales transactions as Excel or CSV file, you can use the Transaction spreadsheet connection to create a new Streamline project.
Watch a video tutorial (3:20)
Transactional spreadsheet connection is able to import the same data types as Database connection. To learn more about them, address to the Data types article.
Streamline allows importing the data through an Excel or CSV file. Since Excel files are multi-sheet documents, they allow importing almost all the data types. Currently only the Substitutions information can't be imported using Excel files. CSV-files are able to import a significantly narrower range of the data types than Excel files.
A CSV-file should contain data types from both Transactional data and Item information (see the table below).
| Demand Planning | Inventory Planning | |
|---|---|---|
| Transactional data |
|
|
| Item information |
|
|
As you see, Orders-to-receive information is imported here through the Qty to receive and Delivery date data types.
In this case, you can import the on-hand level using three ways. The data types for each of them are:
1. On hand change, and the Last on hand that should be matched to the On hand option when importing.
2. Last on hand by matching to the On hand meaning when importing. Use this way if you can only provide the on-hand at the time of import.
3. On hand (as remaining).
Unlike the second method, the first and third methods import on-hand history.
An example of the format is presented in the figure below.
![]()
You can download this example file.
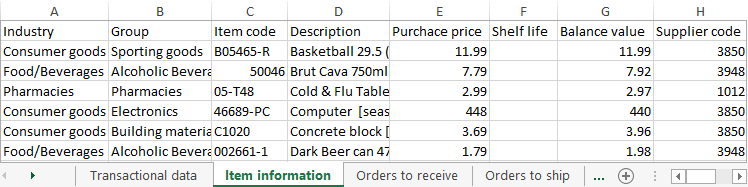
Excel files allow importing almost all of the data types. Each of the data pieces should be on a separate sheet of the Excel document. The first sheet must contain Transactional data. Below, we show the format for each piece of data in an Excel file. The sequences of the data type columns and spreadsheets in the file can be arbitrary.
Transactional Data
![]()
The table must contain one transaction per row.
Item Information
Pay special attention to importing the following replenishment parameters:
These characteristics depend on the echelon the planning item resides at. If a planning item is sourced from a DC, these parameters define the replenishment process from that DC. In this case:
If a planning item is sourced from a supplier:
If your supply chain is described by a two-echelon model and there is a shelf life limitation on an item at the lower echelon, you should also provide a shelf life for the DC that supplies that item. DC's shelf life must then safisfy the condition:
DC shelf life ≥ Lead time + Shelf life,
where:
If the Supplier code is not given, Streamline attaches those items to an empty supplier code.
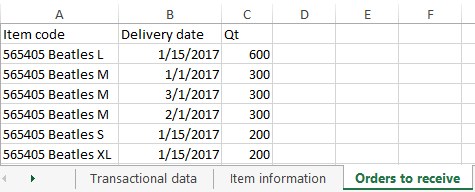
Orders to Receive
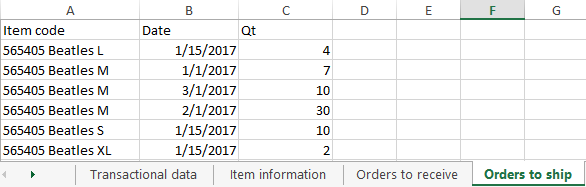
Orders to Ship
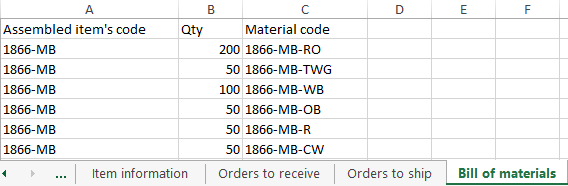
Bill of Materials
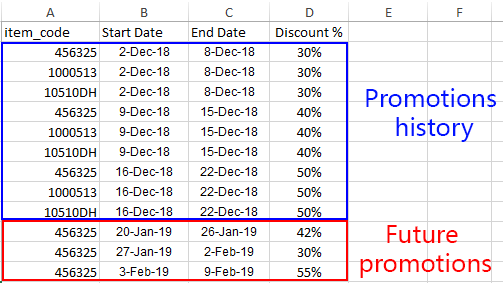
Promotions Information
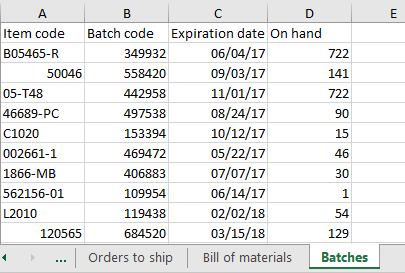
Batches Information
If you import data from Excel files (XLS, XLSX), Streamline understands any date that is formatted by Excel standards. For text files like CSV, the date should be in one of the following formats:
dd.mm.yym/d/yymm/dd/yyyyyyyy/mm/ddyyyy-mm-ddyyyy_mm_ddyyyymmdd Streamline also recognizes these formats in Excel files.
You can download an example of the data formatted in Excel file.
Special Case
Streamline allows you to avoid the Item information sheet and import these data types through the Transactional data spreadsheet (see figure below). In this case, however, the table will contain a lot of duplicated data. Thus, we encourage you to use two sheets – one for Transactional data and another one for Item information.
![]()
You can download an example of the data formatted in Excel file with merged Transactional data and Item information.
To create a new project based on transactional data, do the following:
The Transactional data connection dialog is divided into two parts. The part on the left contains dialog settings, and the right part – a preview of the data that will be imported.
The preview also shows how Streamline understands the data: the dates are green, the text is blue, and the numbers are black. Thus, if dates have the incorrect format, they will be shown in blue or black color in the preview.
The preview has the following tabs:
![]()
CSV delimiter – allows setting the data delimiter used to parse the CSV file. Streamline always tries to determine the delimiter automatically, and in most cases, it works just fine. If Streamline cannot parse the data correctly, you can choose one of the predefined delimiters (comma, semicolon, space, or tab) or enter a custom delimiter manually. If you are importing an Excel file, the option is disabled.
Number of header rows parameter allows setting how many rows in your data table takes the table header. The default value is 1. To ensure that the data table header is loaded properly, take a look at the header of the preview table. If it contains the labels of your header – everything is Ok, if not – adjust the parameter so that the labels will get into the header of the table preview. If the data table has no header, set the control to zero, then the header displays the x1, x2,… labels.
Group timestamps by – used to aggregate the transaction history in the given periods. The options are the Day, Week, and Month. For example, if you want to get monthly forecasts and plans, use the Month option.
Starting from parameter works together with the Group timestamps by and sets the starting day of the Group timestamps by period. For instance, if you need to aggregate your data by month, you can set up Streamline to perform grouping from a given day of the month. The default option is the first day of the month. In the case when you group the data by week and your week doesn't start from Monday, you can choose the proper day of the week in the Starting from drop-down.
Compose date from – used when the date in the data is represented by two columns. For example, year in one column, and month number in another. There are two options: Year + month and Year + week (ISO 8601). To compose date properly Streamline requires the two columns to be one after another, and the first one must contain year. Then, choose the appropriate option in the control and set the meaning of the first column to Date. If the preview depicts the Date column in green, dates are read by Streamline properly.
![]()
Unite locations into a single inventory combines all locations into a single virtual location. The locations' on-hand is summed. This option is handy if your warehouses are located next to each other, so they can be treated and planned as a single aggregated warehouse.
The table of the preview has a special row with a drop-down list in each column. The list displays the data that Streamline understands and can import in the selected tab. The description of the lists’ options is given in the Data that can be imported section. Thus, to import your data properly, match the meaning of your data column to the most appropriate option in the drop-down list.
![]()
To get item information imported, do the following:
![]()
Importing categories
To get in-transition information imported, do the following:
![]()
To get pending sales orders imported, do the following:
![]()
To get the bill of materials imported, do the following:
![]()
To get information on your promotions imported, do the following:
![]()
To import batches information, do the following:
![]()
 Manage book (
 Help
Help