User Guide
1. Streamline Client
2.Streamline Server
3. Starting Up
4. Connecting data
5. Demand and Sales Forecasting
6. Inventory Planning
7. Reference
1. Streamline Client
2.Streamline Server
3. Starting Up
4. Connecting data
5. Demand and Sales Forecasting
6. Inventory Planning
7. Reference
 Add this page to your book
  Remove this page from your book
 In this article we describe:
This connector utilizes several predefined SQL-queries which you can customize to your needs. The data, imported into Streamline, is described in the Inventory Management Systems article.
To create a new Streamline project based on SAP B1 data:
1. Go to the menu File > New > SAP B1 connection. The SAP B1 connection dialog appears (see figure below).
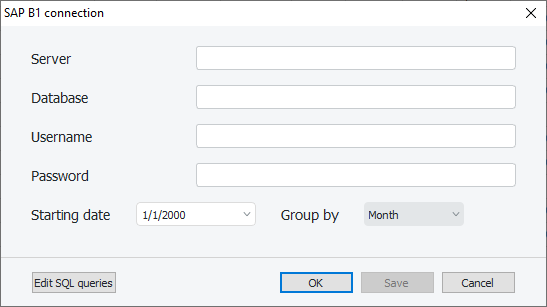
2. Enter the name of the server running the SQL Server with SAP B1 databases.
If you connect locally (Streamline is opened on the same computer where the SQL Server is installed), type localhost in this field.
If you connect remotely, enter IP address (or LAN name of the computer running the SQL Server) and SQL Server TCP Dynamic Port like <IP>,<port>, for example, 108.71.167.47,1434. To connect remotely, you should enable remote connections to the SQL Server and configure SQL Server TCP/IP ports properly.
3. Enter the name of the SAP B1 database into the Database field. To figure out this name, do the following:
3.1. Connect to your SAP B1 SLD service by URL like
https://<sap-server-name>:4000/ControlCenter/
where <sap-server-name> is the LAN name of the machine runnning SAP B1 Server component, for example, https://andrew-pc:40000/ControlCenter/.
3.2. Enter your login and password specified during SAP B1 installation (see figure below).
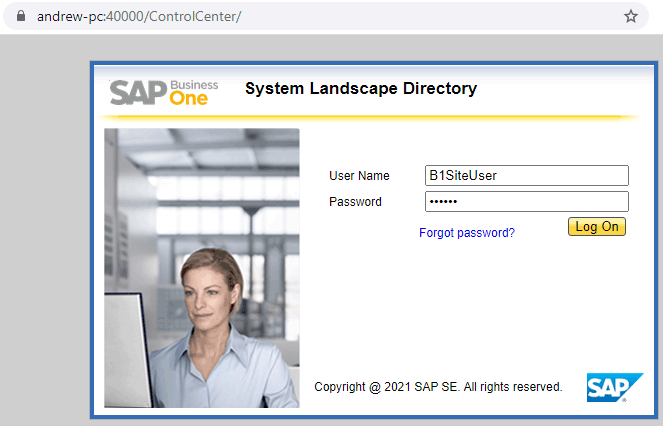
3.3. Select the server, you are connecting to, in the first table. Now it shows you all the available SAP B1 databases on this server in the table below. Pick the database name from the Schema Name column of your company database. This is what we are looking for (see figure below).
4. Enter credentials of a SQL Server account having rights to read data from your database into the Username and Password fields. You can learn how to create such an account from this acricle.
5. Enter or choose the date to start the import from in the Starting date control.
6. Choose the data aggregation period in the Group by control. Streamline automatically aggregates your data in the given periods (days, weeks, or months). For example, if you want to see the forecasts, replenishment plans, and other reports in months, group the data by month.
7. Click OK to start the import.
The Edit SQL queries opens the Database connection dialog where you can customize default SQL-queries to meet your requirements.
In order to Streamline and SLD service connect to SAP B1 SQL Server without any issues, we should set the SQL Server TCP ports properly. To do this:
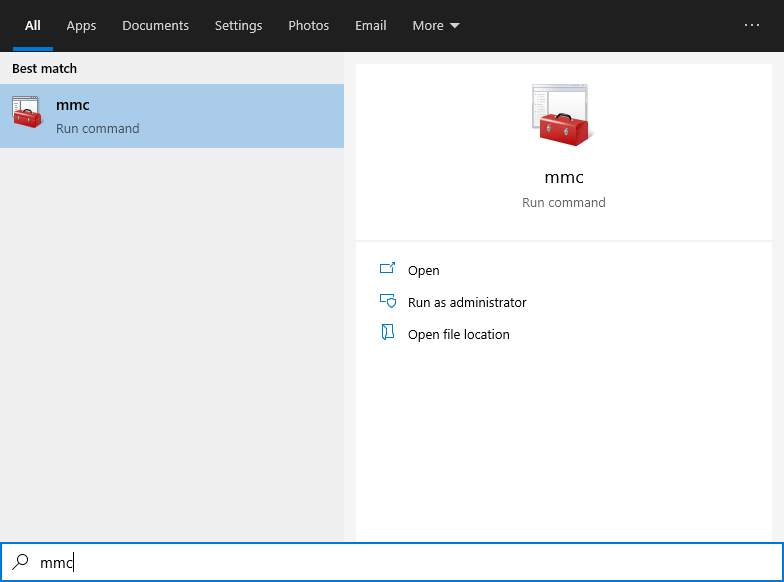
1. Go to Windows applications search, type in 'mmc' and hit Enter (see figure below).
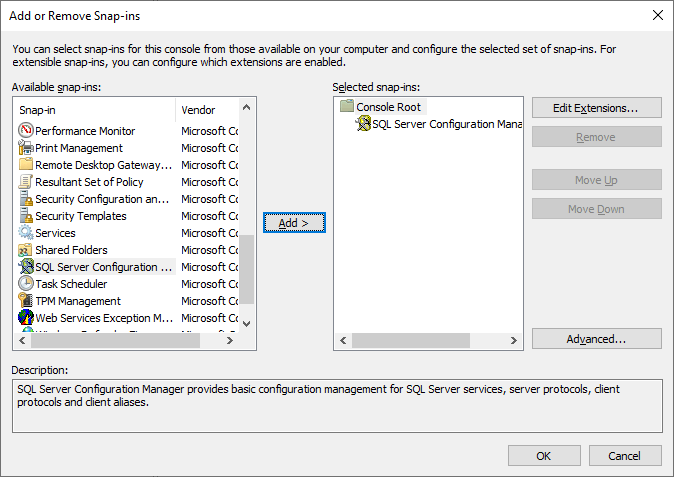
2. Go to menu File > Add/Remove Snap In…, select SQL Server Configuration Manager in the list on the left and click Add button. Then click OK. (see figure below).
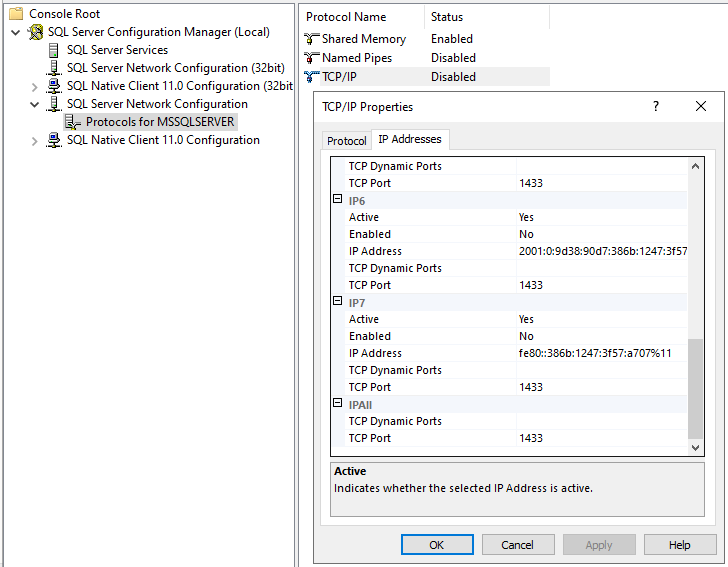
3. Expand the root node down to Protocols for MSSQLSERVER as shown in the figure below. Select it, then, right-click on the TCP/IP item in the list on the right, and select the Properties command from the context menu. Then, go to the IP Addresses tab of the dialog, and scroll it all the way down to the IP All section (see figure below).
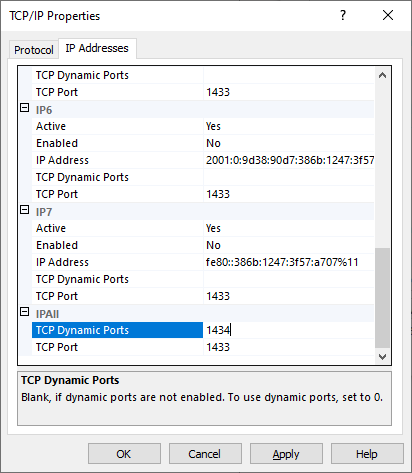
4. Set TCP Dymnamic Ports field to any free port, for example, 1434. This port will be used by Streamline to connect to the SAP B1 database (see figure below). TCP Port is used by SAP B1 SLD service to connect to SQL Server.
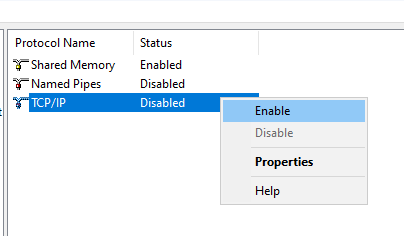
5. If TCP/IP Status is Disabled, right-click on the item, and select Enable command (see figure below).
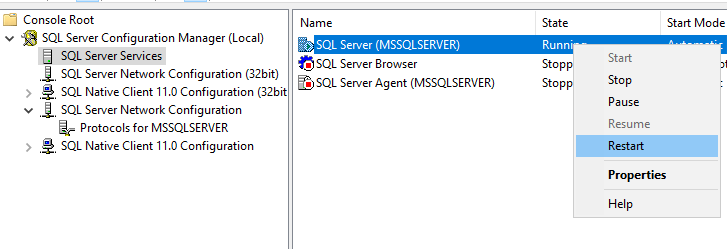
6. After that, select SQL Server Services node on the left, then, righ-click on the SQL Server (MSSQLSERVER) service on the right, and select Restart from the context menu (see figure below).
