User Guide
1. Streamline Client
2.Streamline Server
3. Starting Up
4. Connecting data
5. Demand and Sales Forecasting
6. Inventory Planning
7. Reference
1. Streamline Client
2.Streamline Server
3. Starting Up
4. Connecting data
5. Demand and Sales Forecasting
6. Inventory Planning
7. Reference
 Add this page to your book
  Remove this page from your book
 In this article we describe:
The key entities that Stitch handles are products, variants, warehouses, and channels. Streamline treats variants as items, product as item category, warehouses as locations, and channels as channels.
It also imports Stitch's product description field (via the item info field) that you can use, for example, to import your custom item categories. This field is shown in the Inventory report and can be also used for filter needs.
The integration between Streamline and Stitch is one-directional currently. It means that Streamline pulls all necessary data from Stitch, however, it can't push recommended POs back due to limitations of the API.
Stitch Labs offers two versions of software, Classic Stitch and Stitch X (an improved version of Classic Stitch). While the API provides reading open purchase orders (POs) and transfer orders (TOs) for Classic Stitch, it doesn't expose them for Stitch X. Thus, there is a workaround to import them using a CSV file in this case.
The API does not currently expose on-hand history. It means that Streamline is not able currently to:
Another specificity relates to importing data of partially shipped sales orders. Streamline considers all the lines of a partially shipped order as if they have been already shipped completely and includes this order into the sales history. Streamline has to follow this logic because of a limitation of the API.
This situation is pretty rare and may happen when you have a partially shipped backorder. Consider an example. Let's an order has two lines:
1. Apples, qty = 100.
2. Pears, qty = 1000.
Until this order is shipped completely or partially, it is in the Pending sales orders in Streamline.
If Streamline considers that the demand can't be fulfilled with the current stock, in transition quantity, and pending sales orders, it shows purchase recommendations for ordering the necessary quantity of these fruits. If you create a purchase order in Stitch for these lines based on the recommended quantities and then synchronize that with Streamline everything will be okay.
However, if you make, for example, apples shipped in Stitch (we have a partially shipped order now) before creating the recommended purchase orders in Stitch and synchronize the project then, Streamline will show incorrect purchase recommendations for the unshipped pears.
As soon as API limitations will be removed, we improve the logic for partially shipped orders and make the integration bi-directional.
Data imported into Streamline is described in the Inventory Management Systems article.
Streamline uses Stitch's legacy API to import the data. The API requires you to provide an access token in order to allow Streamline to connect to Stitch. To get the token, please, contact Stitch's support.
To create a new Streamline project based on Stitch data:
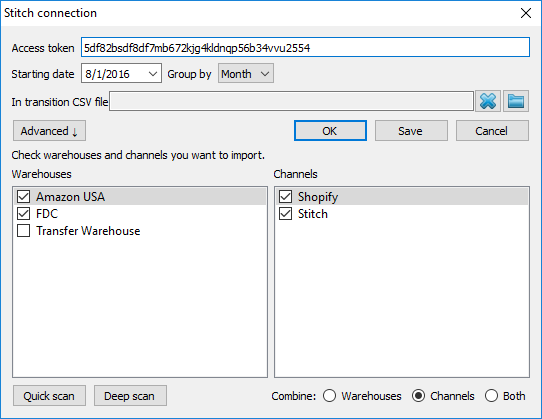
1. Go to the menu File > New > Stitch connection. Streamline shows the Stitch connection dialog (see figure below).
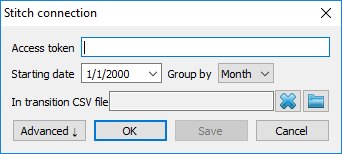
2. Type your access token into the Access token field.
3. Enter or choose the date you want to start the import from in the Starting date control.
4. Choose the data aggregation period in the Group by control. Streamline automatically aggregates your data in the given periods (days, weeks, or months). For example, if you want to see the forecasts, replenishment plans, and other reports in months, group the data by month.
5. Set a CSV file with open POs and TOs. (Necessary for Stitch X only.)
The format of the CSV file matches the format of Stitch X's purchase orders import file. The columns that should be given are:
![]()
The file should contain open transactions. For OPs, these lines contain products that are being delivered now from your suppliers to your warehouses. For TOs, these are the lines that have been already dispatched from a source warehouse (the on hand has been decreased), however, they have not been yet received to the destination warehouse (the on hand has not been changed).
To set the file, click the folder icon near the In transition CSV file, browse to the file, and click the Open button.
6. Click OK to start the import. In this case, Streamline imports all the warehouses and channels that you have in Stitch. The demand of all your channels is combined in one virtual channel. The inventory is imported by each warehouse separately.
![]()
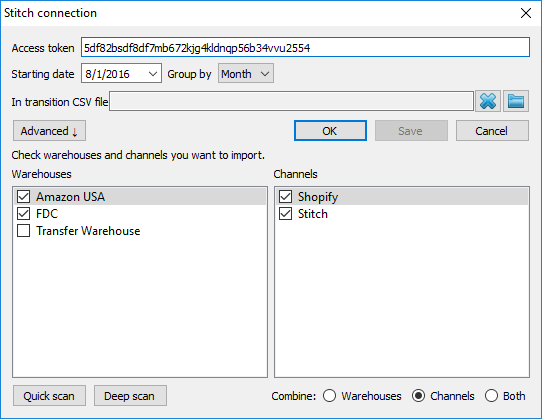
The Advanced button of the Stitch connection dialog shows some additional settings helping you to select a particular set of warehouses and channels you want to import (see figure below). These settings also allow you to combine channels, warehouses, or both of them.
To make use of the settings:
1. Scan Stitch for available warehouses and channels. To do this, click either Quick scan button or Deep scan button.
Quick scan finds all channels and those warehouses that are attached to them. Thus, if you need to import only the warehouses that are attached to your channels, use this type of scan. As the scan is completed, Streamline shows found warehouses and channels in the lists.
Deep scan scans for all available Stitch's warehouses and channels.
2. Select the necessary warehouses and channels from the lists.
3. Choose your combine option.
4. Click OK to start the data import.
The data update workflows for Classic Stitch and Stitch X are different.
If you use Classic Stitch, updating the project is quite simple – just click the Update data button found on the program toolbar.
As mentioned above, the API doesn't currently expose information about open POs and TOs for Stitch X. It means that you should handle the synchronization of this information manually. It should be done through a CSV file that is a part of configuration settings of the Stitch connection. Below we describe the steps you need to take to do the synchronization.
Assume, you have set a CSV file with current open PO/TO transactions when first import your data. To synchronize these data correctly as they change in the future, follow these steps:
You can reset your connection configuration at any time. To do this:
1. Open your Streamline project.
2. Go to the menu File > Change connection > Stitch connection. Streamline shows you current configuration (see figure below).
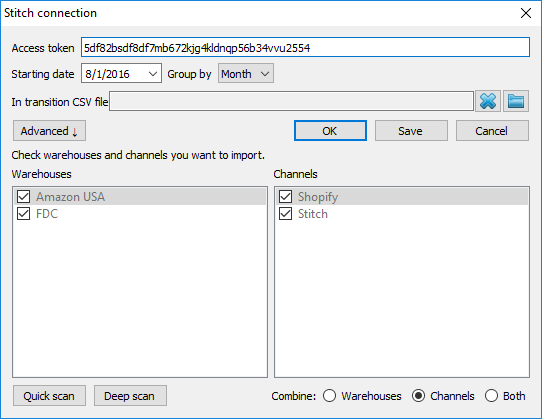
3. You can reset the CSV file with open POs and TOs. (Necessary for Stitch X only.)
4. Scan for new warehouses or channels (see figure below).
5. Select or deselect necessary warehouses/channels.
6. You can reset your combine option.
7. Click the Save button to save the connection changes.
Typically, the next step is to find out, either update the project or reimport it completely.
 Manage book (
 Help
Help